Thursday, December 31, 2009

Happy New Year!


Adding the Brag Button on 1/4/2010 to show how I used an image from the Graphics Fairy.  I love this Polish postcard along with my music.


It was meant to be! This Polish girl just had to choose the Polish post card from Graphics Fairy to ring in the new year. Na zdrowie!

FYI: Keeping with the theme, totally coincidentally, my card using the Russian Dolls stamp is featured on the Queen Kat Designs official blog today! Link here: QKD

Monday, December 28, 2009

QKD Royal Monday Blog Hop

Don't forget each week we have two Royal Court blog hops. I'm on Monday's hop list. The other half of the QKD Design Team will reveal their cards on Wednesday. For both hops, and to start at the beginning to see all of the great projects, click on QKD. If you've been following the blog hop, you came from my new Monday blogging buddy, Alex. Next up is my Stampin' Saturday partner, Penny.


This week the Royal Court has a  SPOTLIGHTING Technique challenge.  This is where a small piece of your creation is in color popped out from the rest card, and the rest of the card is monochromatic. Here is my project using the QKD Wa Loli stamp. I used fluid chalk to create a beige monochromatic background. Pink is my pop of color. I was in Tokyo in the early '70s and remember studying what the crowds were wearing. Since Tokyo is one of the fashion capitals of the world and Wa Loli is in trendy garb, I made this tag to pay homage to all of the fashionistas in the world. Captured in time is the caption on the tag. Additional materials: Kaiser craft wood flower, Prima flower, Tim Holtz Ideaology snaps, vellum mannequin.
I encourage you to scroll down to Sunday's post.  This is another monochromatic card with teal as the pop of color using the QKD Northern Exposure stamp set.

Lost Days Sale  The server was down for a couple of days, so Queen Kat is having a sale!
40% off past kits
40% off QKD stamps
Free stamp with personalized stamp purchase (free stamp will be your name and email addy)

Here's today's Monday QKD blog hop list, to help you navigate in cyberspace.
QKD blog-
Alex's blog
Helene's blog -- You're here with me!
Penny's blog
Meredith's blog
Anita's blog
Ashley's blog
Queen Kat Designs Store

Sunday, December 27, 2009

Midnight Madness Sketch Challenge Week #33 (MMSC33)


Materials used:  Queen Kat Designs: Northern Exposure stamp set; Cuttlebug: Swiss Dots embossing folder; Sandylion Essentials: Holiday Snowflakes; Copic Sketch markers: BG72, BG75; Ranger: Tim Holtz Distress Ink in Broken China; Colorbok: Clear Rhinestones; Wal Mart: teal glittered snowflake ornament; Elsie patterned paper: Noel Wonderland.

Thursday, December 24, 2009

Blog Award


My cyberfriend, Angela Holt, gave me this award. She works wonders with graphics for us over at Pages In Time. If you look on my sidebar, you'll see her blinkie linked to her blog. Thanks, Angela! Getting a blog award is a great way to finish up the 2009 year.

Monday, December 21, 2009

Monday and No QKD Blog Hop

Queen Kat has given us the week off. If you've stopped by for the Monday QKD Blog Hop, I'm sorry to disappoint you. I hope to have another post up before Christmas. And be sure to return to our QKD Monday Blog Hop next week!

Thursday, December 17, 2009

QKD 12 Days of Christmas Challenge #12 and EARLY CHRISTMAS PRESENT FOR ME!

Two photos for you today. The 2nd photo is a great stocking stuffer.

Pocket cards are really popular now. Here's my version of a pocket card featuring the QKD Rocker Bird stamp. I'm sending this card to my secret sister on another site. I'm putting in the pocket a couple of small packages of card making supplies. The QKD Funky Swirl is stamped on the tag. Notice anything special about the back of the card?????? Read on.....
Queen Kat Designs also produces special order stamps. And here is my very own..... I just love it. QKD also makes personalized address stamps. I own that one too! Merry early Christmas to me. Wouldn't these stamps be great stocking stuffers?

Wednesday, December 16, 2009

Pages In Time Featured Layout of the Week


I recently blogged about joining Pages In Time. It's a good fit for me because I love scrapping, altered art, and cardmaking. We share all of those things there. As a newbie, I started a group at PIT called All Things Vintage. And I was busy uploading to PIT's gallery what I considered my best vintage artwork.
I'm jumping up and down here (yes, and keyboarding at the same time--we artsy types can multi-task!) because Karen chose one of my layouts as the Featured Layout of the Week.
I just love Graphic 45 papers. You see them in my recipe mini-album, my Christmas cards and tags, and my layouts. You just can't go wrong with their beautiful vintage patterns and images. (They didn't pay me to say that!)

Monday, December 14, 2009

QKD Royal Monday Blog Hop and QKD 12 Days of Christmas Challenge: Project 11

Today the Royal Court Design Team has a color challenge: blue, silver, and white. The technique I used is difficult to photograph. The sun washed out the silvery gray background (making it look too white) and caught one of the three clear rhinestones that I placed on top of the blue buttons. So bling it is! If you've been following the blog hop, you came from my Monday blogging buddy, Kelly. Next up is my Stampin' Saturday partner, Penny.

This background technique is called polished stone. I put drops of dye reinker onto a cotton ball and dabbed the cotton ball onto glossy cardstock (not to be confused with glossy photo paper). The inks I used are two shades of blue and also metallic silver. Even heat setting the ink didn't dry it. I waited two days to make sure the background was dry before I stamped the snow people from the QKD Northern Exposure stamp set with VersaMark and heat embossed with black embossing powder. Then I took a cotton swab dipped in bleach and removed the background ink from the images. I discovered that metallic ink doesn't want to cooperate with bleach removal. But the overall effect looks like more realistic snowballs.
I found some matching blue cardstock (harder than you think--too many shades of blue) for the card base, cut with my scallop scissors some silver metallic card stock, and added silver and blue ribbons.
This card also counts for my QKD 12 Days of Christmas Challenge. One more project to go! While you're visiting me here, I'd love for you to scroll down to yesterday's post where you'll see three more projects using QKD stamps!

I've been doing some internet shopping for holiday gifts. QKD is a great place to shop for all of your stamping needs for you and your friends. Right up to Christmas you can enjoy these specials:
Cyber Days Shipping Sale
35% off QKD Stamps
30% off on all Past Kits
(Good today through12/25/09)
(Excludes the separates line & personalized & custom stamps)

Here's today's Monday QKD blog hop list, to help you navigate in cyberspace.
QKD blog-
Alex's blog
Kelly's blog
Helene's blog -- You're here with me!
Penny's blog
Meredith's blog
Linda's blog
Anita's blog
Sara's blog
Queen Kat Designs Store

Sunday, December 13, 2009

QKD 12 Days of Christmas Challenge Project #10

For this QKD project, I made a tag using Graphic 45 papers, the QKD Fancy Christmas stamp to heat emboss a gold tree, and an image of a girl from Red Lead. I added black beads to the tag, gold ribbon, and Making Memories holly berries. I did it! I got 3 projects posted towards my 12 Days of Christmas using QKD stamps!

MMSC#31 and QKD 12 Days of Christmas Project #9


I enjoyed this sketch challenge because I never would have cut a circle in half and positioned it this way on the card front. But I love the finished look. I chose to make a gate card, another first for me. The layered sentiment is glued down only on the right side, allowing the card to open. A photo of the inside is directly below.
Products used: Queen Kat Designs stamps: berry frame from Give Thanks set; sentiment from Christmas Greetings set; Bo Bunny's Back to Backs reversible heavy weight paper: St. Nick Mistle Toe for the gate card base and 12" St. Nick Cut Outs for the scalloped circle on the card front and the Letter to Santa placed on the inside of the card; Memento Tuxedo Black and Cottage Ivy dye inks; Marvy Twinklette red glitter marker; Ranger Diamond Stickles.
Below is the inside of the card, showing the reverse of the patterned paper and the cutout I chose.

QKD 12 Days of Christmas Challenge Day 8

Today I'm hoping to get caught up on my 12 Challenges using QKD stamps. Technically it's projects instead of days now as there should be three posted here by tonight.

Day 8 aka Project #8: Vintage Boy Tag
As a member of the QKD Royal Court Design Team, today is my turn to post a tag on the QKD official blog as part of Queen Kat Designs' 12 Days of Christmas. (This is a separate event from my QKD 12 Days of Christmas personal challenge on my blog.) I followed Tim Holtz' 12 Days of Christmas Tags tutorials on his blog. Yesterday he posted his Day 12 tag that I quickly adapted for my vintage images and QKD stamps. (As a member of Pages In Time, I was given a challenge to use this vintage image in a project--the little boy just needed to be part of this tag.) Here is the tag and description I posted on today's QKD blog:

I'm a vintage kinda gal. Today I'd like to show off the Queen Kat Designs stamps that are perfect for my vintage projects.
If you are following Tim Holtz's 12 Tags of Christmas, then you know this tag follows the general concept of his tutorial for Day 12 (which was yesterday on his blog). You will have to go to his blog for the detailed directions, but I can explain how I made my tag. First I have to tell you that I nearly fainted when I saw Tim's Day 12 tag because I knew it was a perfect fit for Queen Kat Designs stamps!!!!! I used the QKD Funky Swirl stamp and the QKD Aged Text Background stamp.
I started with a white tag 2-1/8" by 4-1/4", smaller than the typical TR tags. I wanted to incorporate this adorable image of a young boy (FreeVintageImages.com) and a Maya Road flower so I used Ranger Distress Ink in Broken China. I also used Ranger Tea Dye Distress Ink and Memento Lady Bug (red) and Tuxedo Black dye inks. My music strip was beige (Flair Designs, Inc.: Jingle Bells). I cut two brown felt leaves from de Vines by Prima. Brown ribbon, Hero Arts teal Gemstones, and a Santa circle from Graphic 45 Christmas Past tags 12x12 sheet complete the supplies.
I love how the young boy is standing on top of one of the flourishes and how the Santa circle tag (on a pop dot) fits perfectly inside one of the swirls. I told you this QKD Funky Swirl stamp is perfect for this project!

Friday, December 11, 2009

QKD 12 Days of Christmas Challenge Day 7


Just lagging a tad bit behind on these daily QKD challenges. I'm making tags to match the wrapping paper which matches the walls. We're sooo coordinated here! I used the Fancy Christmas Tree stamp set with gold embossing powder, and then Adirondack gold metallic paint dabber to outline the tag.

Monday, December 7, 2009

QKD Royal Monday Blog Hop and QKD 12 Days of Christmas Challenge: Day 6

Don't forget each week we have two Royal Court blog hops. I'm on Monday's hop list. The other half of the QKD Design Team will reveal their cards on Wednesday. For both hops, and to start at the beginning to see all of the great projects, click on QKD. If you've been following the blog hop, you came from my Monday blogging buddy, Kelly. Next up is my Stampin' Saturday partner, Penny.

I'm also taking on Queen Kat's challenge to post 12 Days of QKD Christmas. So check my blog daily for more stamping ideas.

Today's Royal Court assignment is to use this sketch. I decided to pair the sketch with the December release Berry Fairy designed by Amariah Shelton for Queen Kat Designs.


Since one of the sentiments in the Berry Fairy set is Pretty in Pink, I chose Swell Noel pink snowflake paper and coordinating pastel stripes holiday paper left over from last Christmas to create a card for my two great-nieces. I also got out my MS punches to make the snowflakes and lace border. Berry is colored with Copics, Ranger Stickles, and a white Signo pen. I also added a holiday sentiment from the QKD Christmas Greetings stamp set. Then I stickled a larger snowflake and added glittery stickers to the centers of the snowflakes. Sentiments are stamped with Archival Brilliance Pearlescent Orchid ink for a shimmery effect.

Don't forget to end your hop at the QKD store . There are some wonderful specials going on there! And be sure to use my special code for an additional 10% discount!


Here's our new Monday QKD blog hop list, to help you navigate in cyberspace.
QKD blog-
Alex's blog
Vicki's blog--
Kelly's blog
Helene's blog -- You're here with me!
Penny's blog
Meredith's blog
Linda's blog
Anita's blog
Sara's blog
Ashley's blog
Queen Kat Designs Store

Sunday, December 6, 2009

MMSC#30


Heartwarming Vintage Christmas Image. Quickutz Snowflake embossing folder highlighted with Cream Liquid Chalk. Hero Arts flower. I changed the cloud to a snowdrift. I didn't add the embellies on each panel as the patterned paper with text, flowers and leaves already make the design very busy.

All Things Vintage Challenge at Pages In Time

This past week I joined a site, Pages In Time. You will find the permanent link on my sidebar. Currently, Karen is hosting a Christmas **BIG GIVEAWAYS**, now through January 9. Prizes and awards are based on participation points earned. Come on over and help us celebrate! You will see some wonderful work posted there. I learned about this site from Irene Tan's blog.
At the site, I started a group, All Things Vintage. If you love vintage, I'd love to have you join the group.
I'm running a challenge there that earns you 20 points towards the give-away. When I get my item made, I'll add it to this post.

Saturday, December 5, 2009

This is Soooo Me!!!!

Nina gave us this great poem that came from Michelle Zindorf's blog via Sarah's blog .
I'd like to know who the author is.

Twas the night before Christmas, I'm glued to the tree.
I'm wondering what Santa brought just for me.
Could it be cardstock or inkpads or lace?
Or some stamps I said, with a smile on my face.
And that`s when I heard him...."Hi Santa", I said.
He replied,"You know... good girls should be in their beds".
"I know I should Santa, and now I've been caught.
But i was just so excited to see what you brought".
"Well let's take a look in this room where you work"
He shook his head quickly and left with a jerk.
I heard him exclaim as he put it in gear
"You've got enough crap I'll see you next year!".

Friday, December 4, 2009

QKD 12 Days of Christmas Challenge Day 5

These are disposable gift tags--not the fancy, embellished kind that are keepers. These are quick to make with no tears shed when they get thrown out with the crumpled up wrapping paper. I used the largest Russian doll from the set of 3. I recently bought the small teardrop Memento inks that came in a pack of 4 different colors. They are the perfect size to ink up just part of an image. I added the To From sentiment from the Fancy Christmas stamp set. I love combining QKD stamp sets. I colored the rose on the doll's apron and put dots around the scallop edge. I used a gel pen and my Twinklette glitter markers.

Wednesday, December 2, 2009

QKD 12 Days of Christmas Challenge Day 4


A very bleak day in the Midwest, cold rain with a threat of snow. Here is a gift tag to brighten things up a bit. The tree pattern/concept is from Red Lead. The snowman is part of the QKD Northern Exposure stamp set. I used fluid chalk to add a distressed look. Glittery trim is achieved using Ranger Red Stickles, glitter red ribbon and glitter red pompom.

Tuesday, December 1, 2009

QKD 12 Days of Christmas Challenge Day 3

What does this have to do with Christmas ?, you ask. Easy answer. This is a game score keeper notebook to give as a gift. I have 2 sets of old BINGO cards. I used two of the blue ones and primary colors to make the two upbeat covers. Embellishments are other game pieces I've collected. I discovered 8-1/2 x 11" paper cut in quarters fits perfectly inside the covers. I didn't have any rings or key chains small enough to hold it together, so I used two red metallic twist ties.
Now for the Queen Kat Designs stamps. I used two sets: Moving Game and Child's Play.
From Moving Game, I used the boot and house game piece stamps. From Child's Play, I used the domino and then cut up the sentiment (Life's a Game Play It!)so that I could make it one long line to put across the word BINGO. The sentiment is heat embossed with red glitter embossing powder.

Monday, November 30, 2009

QKD Royal Monday Blog Hop and December Release Preview Plus Royal Challenge 12 Days of Christmas Day 2

Don't forget each week we have two Royal Court blog hops. I'm on Monday's hop list so today is a preview of the great new stamps being released Wednesday. Shhhh! Why wait til Wednesday to see the new December stamps! Today you can get a sneak peek!!!!! That means the other half of the QKD Design Team will feature the December releases on Wednesday's hop and the stamps will be available in the QKD store on that date. For both hops, and to start at the beginning to see all of the great projects, click on QKD. If you've been following the December preview blog hop, you came from my Monday blogging buddy, Kelly. Next up is my Stampin' Saturday partner, Penny.

I'm also taking on Queen Kat's challenge to post 12 Days of QKD Christmas. So check my blog daily for more stamping ideas.

My Design Team assignment for December is to create cards and tags with the new QKD December release Northern Exposure designed by the talented Jonathan Pitcher for Queen Kat Designs. Here's a preview of this great stamp set.
When I saw these images, I immediately thought of the current weather transition in the Midwest (USA). Leaves and nuts are still drifting down from the trees, swirling in the air as they make their descent to the ground. We're putting away pumpkins and raking leaves. The cold wind blows in a light snow. Or we awake to a frost on the remaining leaves that crunch under foot. Any flowering plants now have a glittery coating. To me, Jonathan's snow people evoke this feeling of transition, made of snow but adorned with autumn's regalia.

I distressed the edges of a beautiful textured pressed cotton fiber paper for the background. Doesn't it look like those leaves are falling to the ground? I cut a strip of burlap to make a bow and added on top a Maya Road ribbon. After stamping and cutting out the images, I highlighted them with Copic markers and a glitter glue pen. A matching card stock mat and a kraft card, along with glittery leaves and berries complete the Northern Exposure transition card.

Don't forget to end your hop at the QKD store . There are some wonderful specials going on there! And be sure to use my special code for an additional 10% discount! Mark your calendar to return to the store on Wednesday when all of the December release stamps will hit the cyberspace shelves.
And to see more great stamping ideas with these new releases, be sure to start at the QKD blog on Wednesday.
Cyber Days Shipping Sale

Save on shipping rates!
Spend $20 get $2 shipping...
Spend $50 get FREE Shipping...
Spend $100 get FREE shipping & a FREE stamp set!
(Good today through12/1/09)

Here's our new Monday QKD blog hop list, to help you navigate in cyberspace.
QKD blog-
Alex's blog
Vicki's blog--
Kelly's blog
Helene's blog -- You're here with me!
Penny's blog
Meredith's blog
Linda's blog
Anita's blog
Sara's blog
Ashley's blog
Queen Kat Designs Store

Sunday, November 29, 2009

MMSC#29


I turned the sketch on its side and used my new Graphic 45 papers.

Saturday, November 28, 2009

QKD 12 Days of Christmas DT Challenge: Day 1

The day is almost over but I'm posting my Day 1 Christmas Card made with QKD stamps. Queen Kat challenged the Royal Court to post on their blogs 12 days of Christmas. I'm highly competitive and up for the challenge.
This card is made with QKD stamp sets Russian Dolls and Christmas Greetings. The colors I own of Copic markers and the Graphic 45 Renaissance Faire patterned paper (2 double sided sheets = 4 patterns) went well together.

Thursday, November 26, 2009

Happy Thanksgiving!


This Thanksgiving I'm thankful for friends and family and a safe journey for all those coming home for our family reunion weekend.

I'm also thankful for good health, something I've come to fully appreciate after a bout with flu and pneumonia.

And I'm thankful for the friends I've made in person and in cyberspace on my new found art journey of scrapping and stamping.

Have a wonderful Thanksgiving!

Monday, November 23, 2009

QKD Royal Monday Blog Hop


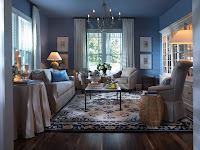
Today the QKD Royal Court Design Team is using a photo for inspiration.
Don't forget each week we have two blog hops. I'm on Monday's hop list, but there is another hop on Tuesday. For both hops, and to start at the beginning to see all of the great projects, click on QKD. If you've been following the blog hop, you came from my new blogging buddy, Kelly. Next up is my Stampin' Saturday partner, Penny.

Each month I have to remind myself that this is an inspiration challenge, not a color challenge---a particularly difficult concept this time around because this photo reminds me of my parlor. You may not see the similarity, but I picked up on the blue because my dining room is navy blue and white, while the parlor is white with navy blue. But then again this isn't a color challenge.
SIX DEGREES OF SEPARATION: With visions of formal rooms and Victorian decor swirling in my head, I came upon Tamra Davis' Victorian shoe tutorial on theCardLadies website. Everything just clicked together. I used her shoe pattern and the directions to make the ruffle. Everything else is my unique take on designing a shoe.

In my stash, I found this ornate cardstock from K& Co called Que Sera Sera Bird's Nest. Here is a photo of it before I cut it up for the Victorian shoe:
I really got the most out of one sheet of paper.
I placed the shoe pattern over the left side. I used that bottom left section for the scallop trim where I placed some sparkly buttons. I cut out one flower for the toe, one flower and the bird for the top of the shoe, and a butterfly for the heel. Then I discovered I didn't have anything for the ruffle. Much to my surprise (timing is everything), my sister-in-law delivered some beautiful felt flocked paper from my niece-in-law ---thanks, dear! I went crazy adding as many embellies as I could find in my stash. From the bird's beak, I hung a sign with a sentiment made with a QKD stamp. It was the perfect finishing touch. Then I had to figure out how to photograph the shoe, so I mounted it on some coordinating green cardstock. Here is the finished project:


Don't forget to end your hop at the QKD store . There are some wonderful specials going on there! And be sure to use my special code for an additional 10% discount! Here's a direct link to the stamp I used on today's project: Sayings Mini Stamp Set
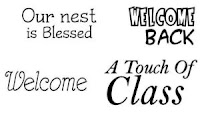
I had trouble deciding between A Touch of Class because of the shoe design and Our nest is Blessed because of the bird's nest I put in the top of the shoe. You can see which one won out.

Here's our new Monday QKD blog hop list, to help you navigate in cyberspace.
QKD blog-
Alex's blog
Vicki's blog--
Kelly's blog
Helene's blog -- You're here with me!
Penny's blog
Meredith's blog
Linda's blog
Anita's blog
Sara's blog
Ashley's blog
Queen Kat Designs Store

Sunday, November 22, 2009

MMSC28 We Shall Hear Angels Christmas Card

This week's sketch included a challenge to make a Christmas card that may be chosen for the Holiday Blog Hop. So I really wanted to make something totally unique.
I started with a thin layer of drywall compound smeared onto my surface. When, partially dry, I use tools and deeply grooved stamps to make imprints. The top right corner is the imprint of a corner swirl stamp. When completely dry, the surface is ready to decorate. (I learned this technique at my Prairie Stampers Club meetings--Yea club!) I used Adirondak Metallics Gold Acrylic Paint Dabber for edging and to highlight the raised portions of the drywall compound. I further highlighted with a liquid gold glitter (no name), and a Marvy Twinklette gold pigmented glitter marker. While that was drying, I stamped my angel image (Angelic set by Olive Wimple) with Jet Black Archival ink and colored as follows: Copic E00 skin white; Copic RV 32 Shadow pink on the skirt, then covered with Ranger Pink Stickles; bodice filled in with a Sakura burgundy Gelly Roll glitter pen; wings and hair with the Twinklette gold glitter marker; violin with two shades of brown watercolor pencils and then blended. Grungeboard snowflake similarly is covered with gold paint and Stickles. I followed the lines of the pattern created in my drywall compound when I placed my two ribbons. The vertical ribbon I pleated and held together with glue dots. I also followed the curve of my swirl stamp when adhering the sprig of greenery as well as stamping the sentiment. A couple of metal embellishments and a Kaiser Kraft pearl complete the design. I then matted the image and the board onto some beautiful felt flocked burgundy paper (given to me by my niece-in-law). I couldn't help distressing the edges for a more vintage look. The angel image is placed with pop dots to level out the unevenness of the compound. I suggest placing the completed piece on a top-folded cardstock for a unqiue Christmas card that can also be used as a wall hanging.

Thanks for looking.

Blog Archive

Family Heritage Album